-
Remapping Caps Lock key to Control in Ubuntu 12.10
Does reaching for the left Control key make your pinky finger uncomfortable? Maybe it’s time to remap that Caps Lock key into a Control key. It’s right next to your natural hand resting spot, is easy to reach and pretty useless at the moment, isn’t it?
In Ubuntu 12.10 it’s very easy to remap special keys. You can do that in just a few steps:
- Open System Settings
- Click Keyboard
- Choose Layout Settings
- Click Options
- Click Caps Lock key behavior to expand it
- Choose Make Caps Lock an additional Control but keep the Caps_Lock keysym or any other option you like
That’s it. Now those shortcuts aren’t as uncomfortable, right?
-
Embedding images in Markdown with VIM
I’ve started using VIM a year or so ago and I’ve never looked back. It’s a very powerful and (in my opinion) efficient text editor, favoured by many programmers. And it’s rival is Emacs.
You can do some very fancy stuff with VIM, but it takes time to learn. You can watch some videos by Derek Wyatt, which showcase what can be done with VIM and are relatively easy to learn from (even though VIM has a steep learning curve).
Batch embedding images in Markdown
First of all, images can be embeded in such way:
If you need to refresh your Markdown syntax knowledge, here’s the documentation by Daring Fireball.
Ok, so the first thing is that we need to get a list of images into VIM. How do we do that? VIM has a
:rcommand, which can read input from files or commands and pastes it into the buffer.Combine with
lsand it’s done::r!ls *.pngThe bang (!) symbol marks, that we’ll read from a command instead of a file. The result should look like this:
filename1.png
filename2.png
image3.png
something_else.png
synthetic_file.png
cookies.png
synthetic_file3.png
Now that we have our filenames in the buffer, we can start converting them. There are multiple ways to do it, but I’ll show you two of them.
Macros
With macros you can do lots of repetetive stuff that you may not be able to or don’t know how to do with substitutions or other means.
qfollowed by a register will start recording the macro. If you hitqagain, it will stop the recording.Here’s the complete macro I used:
yt.i![ESCpla(ESClxA)ESCj0Let’s take a look at what it is doing:
yt.i![ESCp- provided that the cursor is standing at the beginning of the line, it will yank all text until a dot (in this casefilename1) into a unnamed register. Then it will go into insert mode and insert![. I’m not sure if this is handled by some VIM plugin or it’s a standard behavior, but my VIM auto closes with the right square bracket. Then we paste the yanked text withp. Now we have![filename1]filename1.pngin our first line.la(ESClxA)ESC-l(lowercase letter L) moves the cursor to the right, we append text after the cursor withaand type in the left parentheses. Hit the ESCAPE key to go back to command mode.l(lowercase L) to move right andxto delete the right paren (which was autoinserted by VIM). UseAto append the right paren at the end of the filename and hit ESCAPE to go back to the command mode. If you have VIM-surround plugin - you can add parens with it.j0-jwill move down and0(zero) will move back to the beginning of the line.
Substitutions
This approach is sort of easier as it’s pretty much a single command:
%s/\(.*\)\.png$/%s/match/replace_withis the substitution command\(.*\)\.png$will greedy match lines, ending in.pngand will forget about the extension. It’s just regular Regex:.(dot) will match any character and*will try to match 0 or more characters.$marks, that the match should end in.pngis the format we want to use here.\1is the match we told VIM to memorize
Last words
It may look confusing at first, but actually it’s quite easy once you have a grasp of VIM syntax (well, and regex for the substitutions). However, as with everything else, learning them by muscle memory takes time.
If you’ve never used VIM in your life you may think “It’s too much of a hassle to process those 7 images. I could’ve done that in 20 seconds with Notepad!”, and you would probably be right. But you couldn’t be that quick if the amount of stuff to do would grow ten or hundred times. Besides, those 2 commands come in just under 30 characters each.
VIM is documented very well and the documentation is built in, so if you have any trouble with any commands, just type in
:h commandin command mode. -
Stripe CTF 2.0 Write-Up And Solutions
Stripe CTF 2.0 web edition challenge has recently ended. It was lots of fun to participate in.
About 7 thousand people have completed the first level and 978 people have completed the whole 9 challenge CTF competition. Leaderboard.
Now that the challenge has ended, people have posted their impressions and solutions to challenges. Stripe CTF 2.0 Write-Up is a great write-up by droogie from IOActive Labs Research. He posted solutions to all 9 problems with brief explanations for those solutions.
List of attacks:
- Level 0 - SQL Injection
- Level 1 - Misuse of PHP Function on Untrusted Data
- Level 2 - File Upload Vulnerability
- Level 3 - SQL Injection
- Level 4 - XSS/XSRF
- Level 5 - Insecure Communication
- Level 6 - XSS/XSRF
- Level 7 - SHA1 Length-Extension Vulnerability
- Level 8 - Side Channel Attack
-
Stripe Capture The Flag: Web Edition

And so another Stripe Capture The Flag event has begun. Stripe continues on from their last CTF event, where a number of hacking challenges were given, ranging from simple web form cookie hacks to buffer overflows and other magic stuff.
CTF 2.0 is targeted at web based attacks. Interested to learn about XSS, SQL injections, CSRF attacks? This is a good place to do that.
The event has started at
Wednesday, August 22nd, 2012 at 12 noon PDT, and it will end atWednesday, August 29th, 2012 at 12 noon PDT, so it’s not too late to start. If you’re reading this after the ending date - Stripe will publish (or already have done that) all challenges somewhere online.At the time of writing over 5,000 people have passed the first level and there are 9 levels in total (and they are zero indexed). Only 112 have captured the final flag and completed the challenges. Impressively, the first person to finish -
wgrant- has done it in a bit more than 12 hours. Congratulations to him. He had stuck around to give others some useful clues, which is very nice of him.Challenges involved using a large variety of technologies and languages: Node JS, SQLite, PHP, Python, Ruby, Javascript, Flask, Sinatra and others. Most of them were relatively easy (compared to the last two). It’s kind of a shame that the easier levels were written in PHP (quite easily hackable). These days it’s getting a lot of hate, but flaws that were present in those challenges are quite common.
One of the more interesting challenges required a hash extension attack. Apparently SHA-1 has predefined seed values and hashes the message in 64 byte chunks. So even without knowing the salt it was possible to append some malicious data, sign it using the original hash and the system processed it without any hickups. It was expected, but for some reason I was just blown away. Oh, Exploiting SHA-1-signed messages and CodeGate 2010 Challenge 15 – SHA1 padding attack were really helpful with that challenge.
Since the challenge has not finished, I don’t want to spoil it for anyone, so I’m not going to say more about it in this post, maybe some time in the future…

By the way, I have finished this challenge in 25th place. It took me roughly 27 hours to complete, here’s my profile. Too bad I didn’t get in TOP 20.
Thanks to the Stripe team for such a great event, I’m looking forward to future CTFs. Thanks to other friendly hackers on the Stripe IRC that gave some hints along the way, but not spoiled the fun.
And again, if you want to, there still is plenty of time to hop in and Capture The Flag at https://stripe-ctf.com, so don’t hesitate, just go!
-
Distance sensing with ultrasonic sensor and Arduino
I’ve always wanted to play around with Arduino Ultrasound sensor, but the idea of spending 30$ + shipping on a device that I may not use always sounded not that great. Luckily, Dealextreme.com had a copy version of it, called HC-SR04 Ultrasonic Sensor Distance Measuring Module (Affiliate link) priced at $4.60. Not so bad, shall we try it?
Plugging in the sensor
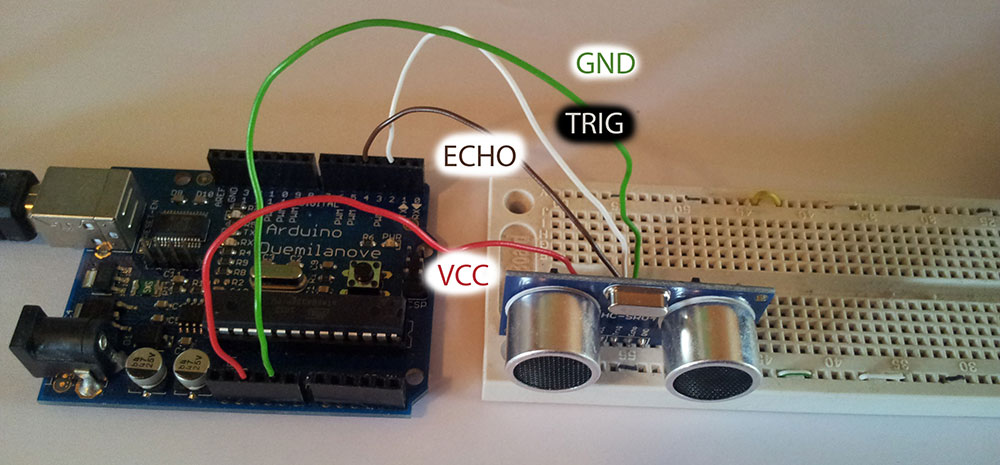
Only upon delivery have I noticed one tiny problem: the original Ping sensor had 3 pins, while my copy version has 4. So I connected the pins this way:
- VCC -> Arduino +5V pin
- GND -> Arduino GND pin
- Trig -> Arduino Digital Pin 2
- Echo -> Arduino Digital Pin 2

The
Trigpin will be used to send the signal and theEchopin will be used to listen for returning signal.After my messy wiring the end assembly looked like this:
Getting data from the sensor
The code is fairly straightforward. I took the original example code for Ping))) sensor and just modified the OUTPUT pin to be
Digital Pin 2, the INPUT pin to beDigital Pin 4and trigger duration to 10 us.After compiling, uploading and running it, in the
Serial Monitor(Tools -> Serial MonitororCtrl + Shift + M) the sensor was sending correct data!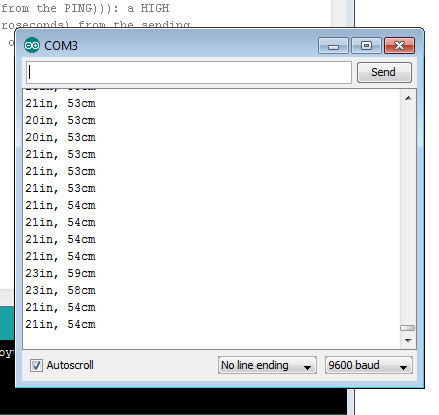
After a bit of fooling around I found out that the range is approximately 2cm - 300cm. Which is not bad, but not perfect either.