-
The Strategy Pattern: Design Patterns
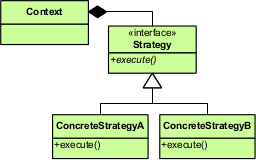
Strategy is a design pattern that allows to change algorithm’s behaviour at runtime. This feature generally gives this pattern more flexibility. It can be usually recognized from algorithm classes implementing a strategy interface and a context class, which dynamically accepts algorithm objects via a strategy interface. E.g. we have our Database class, which may use a MySQLServer or PostgreSQLServer algorithm object to work with different database servers.
Examples usually make it easier to understand a concept, so let’s try and make one. Suppose we want to have a logging class that would be able to log to the database or to StdOut and we should be able to change the desired algorithm as we want (thus the choice cannot be hardcoded).
If we follow the UML diagram, first let’s create an algorithm interface:
<?php

interface iLogger {

    public function log($message);
    public function error($message);
    public function info($message);

}
Supposedly our log algorithm classes will support
log,errorandinfolog types (hence the same operations). Secondly, from the UML diagram we see that algorithm classes should implement ouriLoggerinterface. Let’s create separate classes for logging to the database and logging to stdOut:<?php class DatabaseLogger implements iLogger { public function __construct($server) { printf("Opening connection to the database server %s...\n", $server); $this->server = $server; // openConnectionToServer($server) } public function log($message) { // log to a general log table printf("[%s %s] %s\n", $this->server, date("Y-m-d H:i:s"), $message); } public function error($message) { // log to a general log table as well as error table $this->log(sprintf('ERROR: %s', $message)); } public function info($message) { $this->log(sprintf('INFO: %s', $message)); } }For this example I’m simply outputting log information to the screen for the sake of simplicity, but in a real application we would connect to the database and send queries to insert data into log tables.
<?php

class STDOutLogger implements iLogger {

    public function log($message) {
        printf("[%s] %s\n", date("Y-m-d H:i:s"), $message);
    }

    public function error($message) {
        $this->log(sprintf('ERROR: %s', $message));
    }

    public function info($message) {
        $this->log(sprintf('INFO: %s', $message));
    }

}
Logging to stdOut is simple as well. It simply adds some additional information (e.g. log time) and outputs it.
Then let’s create our
Contextclass (in this case -Logclass). It should dynamically accept a logger and delegate it all logging operations:<?php class Log { public function __construct(iLogger $logger) { $this->logger = $logger; } public function log($message) { $this->logger->log($message); } public function error($message) { $this->logger->error($message); } public function info($message) { $this->logger->info($message); } public function setLogger(iLogger $logger) { $this->logger = $logger; } }As you can see we simply store the supplied logger instance and delegate all logging operations to it. If at any point we decide to switch to a different logger - we can simply call
setLoggerwith an instance of another logger and dynamically swap to it.And lastly, the example usage code:
<?php

require('iLogger.php');
require('Log.php');
require('STDOutLogger.php');
require('DatabaseLogger.php');

// Create a new Log instance and configure it to use logging to stdOut strategy
$log = new Log(new STDOutLogger());

// Log some example information
$log->info('Logging to STDOut may be useful for testing');
$log->error('This is an error');
$log->log('Let\'s try swapping to a DatabaseLogger');

// During runtime we decide to start logging information to the database.
// We can simply set the new logger and continue logging
$log->setLogger(new DatabaseLogger('tmpserver'));

$log->log('Now our logger should be logging to the database');
$log->error('Logging error to the database');
Now if we run our example code with
php5 main.php, we should see the output:% php5 main.php [2014-03-16 21:56:28] INFO: Logging to STDOut may be useful for testing [2014-03-16 21:56:28] ERROR: This is an error [2014-03-16 21:56:28] Let's try swapping to a DatabaseLogger Opening connection to the database server tmpserver... [tmpserver 2014-03-16 21:56:28] Now our logger should be logging to the database [tmpserver 2014-03-16 21:56:28] ERROR: Logging error to the databaseAs you can see it started by logging information to stdOut. At some point we decided to swap to a
DatabaseLogger. We’ve instantiated it, dynamically passed it to ourLoginstance and it continued logging information without any problems.Last thoughts
Strategy is a good design pattern to know. It provides a great deal of flexibility by allowing to dynamically change the behaviour while keeping algorithms separate making the code clearer. However, it sometimes requires more effort to implement and use.
You can find the code above as well as other design patterns I’ve talked about on my GitHub repository here: Strategy Design Pattern
These series on design patterns is something I’ll write on more in the future as I explore more. I hope you find these as useful as I do. If you have any questions or comments - let me know.
-
Expanding Your Toolset #2: Grunt - The Javascript Task Runner
This is the second post in “Expanding Your Toolset” series (previous post was Expanding Your Toolset: Bower - Package Management For The Web). Last time we’ve looked at Bower - a package manager for the web. Bower is useful for quickly resolving dependencies for your project (e.g. if you need a specific version of jQuery, AngularJS, UnderscoreJS and etc.).

GruntJS is a task runner. It’s primary purpose is to automate the tedious stuff we as developers have to do. For example, when developing for the web it’s usually a good idea to minify and combine CSS and Javascript. Do you do this by hand? Or maybe you have a custom shell script to do that for you? Been there, done that. In any case using GruntJS will make it easier and quicker to accomplish such tasks. The community has written many plugins for it (e.g. JSHint, Sass, Less, CoffeeScript, RequireJS and etc.), thus it may be really beneficial for your current (or future) projects.
Installing Grunt
GruntJS is a Javascript library and it runs on NodeJS. It’s distributed via Npm, so to install it globally simply run:
npm install -g grunt-cliAs usual, on Linux you may have to prepend
sudocommand if you’re gettingEACCESSerrors.Setting up Grunt
For a new project we will need to create two files:
package.jsonandGruntfile.js(orGruntfile.coffeeif you use CoffeeScript).For our example we will automate concatenation of a bunch of files.
First let’s set up our
package.json.gruntis needed to be defined as a dependency and we’ll usegrunt-contrib-concatandgrunt-contrib-watchplugins for this example. We don’t provide the version so that Npm would install the latest ones.{ "name": "testproj", "version": "0.1.0", "dependencies": { "grunt": "", "grunt-contrib-concat": "", "grunt-contrib-watch": "", } }Now run
npm installto install all dependencies for our little example. Next let’s set up ourGruntfile.js.module.exports = function(grunt) { grunt.initConfig({ pkg: grunt.file.readJSON('package.json'), concat: { options: { banner: "/* <%= pkg.name %> v<%= pkg.version %>*/\n" }, dist: { src: ['app/dev/aaa.js', 'app/dev/bbb.js', 'app/dev/ccc.js'], dest: 'app/app.js' }, dev: { src: ['app/dev/*.js'], dest: 'app/dev.js' } } }); grunt.loadNpmTasks('grunt-contrib-concat'); grunt.registerTask('default', ['concat']); };module.exports = function(grunt) { ...is the wrapping function that will be executed once you rungruntcommand. This is the basic format, that’s where all of your Grunt code should go to.Configuration is passed into
grunt.initConfig(configuration). Configuration should describe what tasks are available and configuration of those tasks. You can store any arbitrary data in this configuration object as well. In our example we load configuration information frompackage.jsonand will use it to construct the banner.<% %>are template tags (yes, Grunt supports templates).concatdefines configurations for the concatenation task. We can add more tasks and will do so in later examples. We can specify anoptionsobject to override the default configuration for that particular task.distanddevare targets. Unless specified otherwise, if we rungrunt concatit will runconcattask on both targets. But if we rungrunt concat:dist, thenconcatwill only be run fordisttarget.distobject has to have asrcattribute which takes an array of file paths (e.g. in targetdist). Grunt supports globbing (e.g. targetdev), which means any javascript file inapp/dev/will be concatenated intoapp/dev.js.grunt.loadNpmTasks('grunt-contrib-concat');enables you to usegrunt-contrib-concattask. Though it must be noted, thatgrunt-contrib-concatmust be specified as a dependency in yourpackage.jsonfile and installed.grunt.registerTask('default', ['concat']);tells Grunt which tasks it should run if you don’t specify which task should be run. So if you’d rungrunt- it would run the taskconcat. If default task is not specified andgruntcommand is run - it will only returnWarning: Task "default" not found. Use --force to continue.and exit.Next let’s create three files:
app/dev/aaa.js,app/dev/bbb.jsandapp/dev/ccc.jswith their contents respectively:(function() { console.log('File aaa.js'); })();(function() { console.log('File bbb.js'); })();(function() { console.log('File ccc.js'); })();Now if we run
gruntwe should see this:% grunt Running "concat:dist" (concat) task File "app/app.js" created. Running "concat:dev" (concat) task File "app/dev.js" created. Done, without errors.And if we check
app/app.js:/* testproj v0.1.0*/ (function() { console.log('File aaa.js'); })(); (function() { console.log('File bbb.js'); })(); (function() { console.log('File ccc.js'); })();Wonderful, so it is indeed working. Sure, you may not want to use this exact method to combine your javascript (using
grunt-contrib-uglifyis much better). But let’s take it one step further. Let’s usegrunt-contrib-watchto watch for changes in any of ourapp/dev/*.jsfiles and reconcatenate them as needed.Watching for changes
We’ll need to do a few alterations. We’ve already added
grunt-contrib-watchdependency topackage.json. So let’s addgrunt.loadNpmTasks('grunt-contrib-watch');to theGruntfile.js.Then we’ll set up the watching. Add this to the configuration object:
watch: {
    scripts: {
        files: ['app/dev/*.js'],
        tasks: ['concat']
    }
}
So we’re adding a new task
watchwith targetscripts(the target name is arbitrary - you can pick one yourself if you wish). Then we define which files it should watch and which tasks should be executed if any of the watched files change. The end file should look like this:module.exports = function(grunt) { grunt.initConfig({ pkg: grunt.file.readJSON('package.json'), concat: { options: { banner: "/* <%= pkg.name %> v<%= pkg.version %>*/\n" }, dist: { src: ['app/dev/aaa.js', 'app/dev/bbb.js', 'app/dev/ccc.js'], dest: 'app/app.js' }, dev: { src: ['app/dev/*.js'], dest: 'app/dev.js' } }, watch: { scripts: { files: ['app/dev/*.js'], tasks: ['concat'] } } }); grunt.loadNpmTasks('grunt-contrib-concat'); grunt.loadNpmTasks('grunt-contrib-watch'); grunt.registerTask('default', ['concat']); };Now if we run
grunt watchand changeapp/dev/ccc.js, then we should see this:% grunt watch Running "watch" task Waiting...OK >> File "app/dev/ccc.js" changed. Running "concat:dist" (concat) task File "app/app.js" created. Running "concat:dev" (concat) task File "app/dev.js" created. Done, without errors. Completed in 0.382s at Fri Mar 07 2014 22:58:49 GMT+0200 (EET) - Waiting...As you can see it reruns
concattask on each change as expected.You can really leverage
watchtask in certain situations. For example it was used forgrunt-contrib-livereload(and apparently it’s now baked in directly intogrunt-contrib-watch!) to detect code changes and refresh your browser automatically. And since Grunt can play with other languages well, I’ve used it with grunt-shell to do some rapid prototyping with Python (nothing fancy, it detects any changes and reruns the application, yet it sped up the working process).Usage ideas
The example above should give you the basic picture of how Grunt works. I’ve realized that there are many use cases for this tool and it probably be pointless to describe each one step by step, so I’ll just provide you with some ideas how Grunt could help your workflow and point to some plugins. You can read their wiki pages for integration details.
- Linting Javascript/CSS: grunt-contrib-jshint, grunt-contrib-csslint
- Compiling SASS/LESS/CoffeeScript: grunt-contrib-sass, grunt-contrib-less, grunt-contrib-coffee
- Compiling Handlebars/Jade templates: grunt-contrib-handlebars, grunt-contrib-jade
- Testing: grunt-mocha, grunt-contrib-qunit, grunt-mocha-test, grunt-contrib-nodeunit, grunt-contrib-jasmine
- Running shell commands: grunt-shell
- Watching for changes, reloading your browser when code changes: grunt-contrib-watch
- Minifying Javascript/CSS/HTML: grunt-contrib-uglify, grunt-contrib-cssmin, grunt-contrib-htmlmin
- Optimizing images: grunt-contrib-imageming
Last thoughts
I haven’t provided as many examples as I wanted to, but I hope that this one example gave you an idea of how this works and whether it would fit into your workflow. Personally, I really like Grunt so far and I’ve already started to integrate it into my projects. Currently it’s limited to minifying code and running shell commands, but I hope to expand the usage as I explore.
Grunt can help a lot if you allow it to do so. Community has already created 2443 plugins (at the time of writing), so I bet there’s a lot that can be automated simply by installing a plugin. And if there’s no plugin for your use case - you can simply create one and publish it yourself.
-
Expanding Your Toolset: Bower - Package Management For The Web
I’ve been doing web development for quite a while and certainly the whole development process has a few pains. E.g. making sure the libraries were all up to date, managing dependencies, combining and minifying scripts (or often forgetting to do so). It’s simply a chore that has to be done.
Over the past month a few tools came to my attention that help with chores mentioned above. Those tools are Yeoman, GruntJS and Bower. I’ll go over all three in next few posts, but let’s start with Bower.
What is Bower?

Bower is a “Package manager for the web”. It was created and opensourced by Twitter.
Installing Bower
Before the installation make sure that you have Git installed, as some packages may require it.
Bower is written in Javascript for NodeJS, so you can install it easily via NPM:
npm install -g bower-gmeans that we want Bower to be installed globally. If you don’t want to do that - just remove-gand it will be installed in your current directory.If you get
EACCESerrors - prependsudoto the command:sudo npm install -g bowerFor any other errors consult StackOverflow.
Once that’s done, we’re ready to take a closer look at it.
Using Bower
The great thing about Bower is that it allows you to install packages not only from Bower’s own package registry, but also via other means. As of the day I’m writing this post the list of supported endpoints is:
- public remote Git repositories
- private remote Git repositories (supports authentication via https and ssh)
- local Git repositories
- public remote Subversion repositories
- private remote Subversion repositories
- local Subversion repositories
- Github repositories (supports shorthand syntax,
<owner>/<repo>) - URLs to
ziportararchives (contents will be extracted automatically)
Installing the latest version of a package is as simple as running:
bower install <package name>or if you want a specific version:
bower install <package name>#<version>If you’re not sure what to install and want to search for packages:
bower search <keyword>Example
Say we want to install EmberJS. We don’t know how the package is named precisely and do a search run
bower search ember. It yields:$ bower search ember Search results: ember git://github.com/components/ember ember-data-shim git://github.com/components/ember-data.git ember-data git://github.com/components/ember-data.git ember-mocha-adapter git://github.com/teddyzeenny/ember-mocha-adapter.git ember-testing-httpRespond git://github.com/trek/ember-testing-httpRespond.git ember-addons.bs_for_ember git://github.com/ember-addons/bootstrap-for-ember.git ember-model git://github.com/ebryn/ember-model.gitNow we install the ember package with
bower install ember. It will go and install ember along with it’s dependencies. You should get something similar tobower ember#* cached git://github.com/components/ember.git#1.3.1 bower ember#* validate 1.3.1 against git://github.com/components/ember.git#* bower ember#* new version for git://github.com/components/ember.git#* bower ember#* resolve git://github.com/components/ember.git#* bower ember#* download https://github.com/components/ember/archive/1.4.0.tar.gz bower ember#* extract archive.tar.gz bower ember#* resolved git://github.com/components/ember.git#1.4.0 bower jquery#>= 1.7 <= 2.1 cached git://github.com/jquery/jquery.git#1.10.2 bower jquery#>= 1.7 <= 2.1 validate 1.10.2 against git://github.com/jquery/jquery.git#>= 1.7 <= 2.1 bower handlebars#>= 1.0.0 < 2.0.0 cached git://github.com/components/handlebars.js.git#1.3.0 bower handlebars#>= 1.0.0 < 2.0.0 validate 1.3.0 against git://github.com/components/handlebars.js.git#>= 1.0.0 < 2.0.0 bower jquery#>= 1.7 <= 2.1 new version for git://github.com/jquery/jquery.git#>= 1.7 <= 2.1 bower jquery#>= 1.7 <= 2.1 resolve git://github.com/jquery/jquery.git#>= 1.7 <= 2.1 bower jquery#>= 1.7 <= 2.1 download https://github.com/jquery/jquery/archive/2.0.3.tar.gz bower jquery#>= 1.7 <= 2.1 extract archive.tar.gz bower jquery#>= 1.7 <= 2.1 resolved git://github.com/jquery/jquery.git#2.0.3 bower ember#~1.4.0 install ember#1.4.0 bower handlebars#>= 1.0.0 < 2.0.0 install handlebars#1.3.0 bower jquery#>= 1.7 <= 2.1 install jquery#2.0.3 ember#1.4.0 app/bower_components/ember ├── handlebars#1.3.0 └── jquery#2.0.3 handlebars#1.3.0 app/bower_components/handlebars jquery#2.0.3 app/bower_components/jqueryOur new directory structure is:
  % tree -d app
app
└── bower_components
    ├── ember
    ├── handlebars
    │   └── lib
    │       └── handlebars
    └── jquery
        ... SNIP ...

23 directories
As you can see, by default it places all packages in
app/bower_components.Customizing install directory
Say our project has a different directory structure and we want to install packages to
js/instead ofapp/bower_components. To do that we create a.bowerrcfile with a JSON object:{ "directory": "js" }Now if we install
emberagain withbower install ember, you should see, that Bower installed it tojsdirectory, just as we told it to:% tree -d . . └── js ├── ember ├── handlebars │ └── lib │ └── handlebars └── jquery ...Snipped... 23 directoriesAutomating installation of all dependencies
Say we’re not the only ones working on a project. Let’s assume that we don’t want to commit dependencies to version control. Will other people need to run the exact same commands to install all dependencies our project has? Well, that’s where we’ll create our own package.
A bower package project is defined in file
bower.json. (it’s similar to Ruby’sGemfileor PHP Composer’scomposer.json)You can create the file with
bower initand the guide will walk you through all the options, but let’s create this one by hand. Create a new filebower.jsonwith contents:{ "name": "test", "version": "1.0", "dependencies": { "ember": "", "bootstrap": "~3.1.1", "underscore": "" } }I’ve added a few more packages just to make this example more visual. As you can see the version of the package can be specified as a value of
dependenciesobject. If you omit the version Bower will install the latest one.Now if we run
bower installBower will install all packages to our install directory (app/bower_componentsby default,js/if you’ve left our custom install directory):% bower install bower bootstrap#~3.1.1 not-cached git://github.com/twbs/bootstrap.git#~3.1.1 bower bootstrap#~3.1.1 resolve git://github.com/twbs/bootstrap.git#~3.1.1 bower ember#* cached git://github.com/components/ember.git#1.4.0 bower ember#* validate 1.4.0 against git://github.com/components/ember.git#* bower underscore#* cached git://github.com/jashkenas/underscore.git#1.6.0 bower underscore#* validate 1.6.0 against git://github.com/jashkenas/underscore.git#* bower jquery#>= 1.7 <= 2.1 cached git://github.com/jquery/jquery.git#2.0.3 bower jquery#>= 1.7 <= 2.1 validate 2.0.3 against git://github.com/jquery/jquery.git#>= 1.7 <= 2.1 bower handlebars#>= 1.0.0 < 2.0.0 cached git://github.com/components/handlebars.js.git#1.3.0 bower handlebars#>= 1.0.0 < 2.0.0 validate 1.3.0 against git://github.com/components/handlebars.js.git#>= 1.0.0 < 2.0.0 bower bootstrap#~3.1.1 download https://github.com/twbs/bootstrap/archive/v3.1.1.tar.gz bower bootstrap#~3.1.1 extract archive.tar.gz bower bootstrap#~3.1.1 resolved git://github.com/twbs/bootstrap.git#3.1.1 bower jquery#>= 1.9.0 cached git://github.com/jquery/jquery.git#2.1.0 bower jquery#>= 1.9.0 validate 2.1.0 against git://github.com/jquery/jquery.git#>= 1.9.0 bower ember#* install ember#1.4.0 bower underscore#* install underscore#1.6.0 bower jquery#>= 1.7 <= 2.1 install jquery#2.0.3 bower handlebars#>= 1.0.0 < 2.0.0 install handlebars#1.3.0 bower bootstrap#~3.1.1 install bootstrap#3.1.1 ember#1.4.0 js/ember ├── handlebars#1.3.0 └── jquery#2.0.3 underscore#1.6.0 js/underscore jquery#2.0.3 js/jquery handlebars#1.3.0 js/handlebars bootstrap#3.1.1 js/bootstrap └── jquery#2.0.3bower installwill also install any missing dependencies, so if we “accidentally” remove a package and then runbower install, we should see the missing dependency installed again:% rm -rf js/underscore % bower install bower underscore#* cached git://github.com/jashkenas/underscore.git#1.6.0 bower underscore#* validate 1.6.0 against git://github.com/jashkenas/underscore.git#* bower underscore#* install underscore#1.6.0 underscore#1.6.0 js/underscoreAnd lastly, if you want to update packages, use
bower update.Last thoughts
So far I really enjoy using Bower. I’m excited that it makes one more web development pain go away, but I suspect it will have a larger impact once we start using Bower in combination with GruntJS and Yeoman. I will cover those in next few posts, so that’s it for today.
Useful links
-
Supercharging your (Wordpress) website with Cloudflare
Websites can be slow, this is especially true with websites using Wordpress. Plugins must be used to customize the site to satisfactory levels, but such levels of flexibility, that Wordpress is quite good at, allowing incredible transformations of your website, cause performance to plummet. On top of that, Wordpress is written in PHP - an interpreted language. PHP is known to be a bit slower than Python and Ruby, and doesn’t even come close to performances of compiled languages, such as Java or Go, which may be one of the reasons why your website loads in 10 seconds instead of 3.
I do not mean, however, that choosing PHP and Wordpress is wrong. It’s not. It is very easy to get started, use of both PHP and Wordpress is widespread, meaning good support from the community, ability to choose from tons of 3rd party extensions. I mean that as your project grows, certain actions will need to be taken in order to help it grow in a scalable manner. Tens, hundreds or thousands of daily visitors may not necessarily have an impact on loading times and stability of your precious website, but once we get into the realm of tens, hundreds of thousands or even millions of visitors - that’s when you definitely notice the impact - things get veeery sluggish.
Another thing that impacts the speed of your website is other resources that the browser needs to download and process. That may be styling information, fonts, images, videos, client-side scripts (e.g. Javascript). We want to minimize the amount of requests (how many files need to be downloaded) and file sizes in order to maximize the loading speed.
The best we can do is simply by being as lazy as possible - avoiding work as much as possible. In Computer Science the most common technique of doing that is caching - doing the computation once (or in our case generating a Wordpress page) and storing results on some storage medium for as long as possible, so that any further requests for the same thing would be simply retrieved from storage instead of having to do the computation again. E.g. Let’s say we want to bake an apple souffle. We don’t know the recipe, so we look it up on the internet, print it out and put it into our recipe book so that if we want to bake an apple souffle again, we wouldn’t need to look for that perfect recipe online for hours again - we simply check our recipe book.
Cloudflare is the service that does pretty much the same thing for your website. Any static resources can be cached for specific durations and if needed optimized (optional, can be configured). It is a paid service, but there is a free plan. Their free plan is great for most websites, but if you want that extra “umph” and more flexibility - I would really recommend looking into their paid plans. People I work with and myself are very happy with it. Though I’m not affiliated with Cloudflare, it’s simply a great and pleasant to use service.
Cloudflare works as an intermediary service between your users and your service (a reverse proxy would be a more technical term). Your domain will have to be redirected to their servers. Once a visitor requests some page or resource, the request will hit Cloudflare’s servers, which in turn will either return a cached resource or fetch the resource from your server and then cache it. So if a resource is cached on Cloudflare’s servers, they will not request your server it, meaning that will save your server some load.
You may ask “OK, I get it, but how can it really help me? What would I need to do?”. Great question! Let’s dive right into it. But before we do that, I just want to note that things I mention below will be intended for Wordpress users, however they would most likely work just as fine for just about any website, just slight modifications may be needed.
Level 1 - Basics
The first step would be signing up for Cloudflare and enabling the service. You can do that here https://www.cloudflare.com/sign-up. The setup process is well described along the way, so you should be fine. Go, register, set it up (that involves changing DNS records of your domain) and come back once you’re done, I’ll wait here.
Once that’s done, go to Cloudflare Settings for your domain.
Settings Overview tab
We’ll want to make sure that Always Online is set to On. It means that if your web server accidentally breaks, Cloudflare will still display the website.
Security Settings tab
I usually recommend setting Security Profile and Basic Protection Level to Medium - a happy medium. It will still challenge users who spam, but a bit less vigorously. This is a setting you’ll need to play around with if you see it not working. If you still see spam - try using a higher setting.
Challenge passage TTL - 30 minutes. Allow users that have shown signs of spam to browse without having to enter more captchas. I don’t recommend to set it as low as possible, as sometimes people may unintentionally spam. Accidents do happen and we don’t want to block their access entirely.
Enable E-mail address obfuscation (to prevent automatic collection of emails by robots while still leaving email addresses readable for humans) and “Browser integrity check” (helps detect spammers by verifying their browser headers)
Performance Settings tab
Performance Profile - Custom. We’ll customize things a bit.
Caching level - Basic. That’s usually enough, depending on your setup you may need to use Aggressive instead if resources use query strings. If you’re not sure - leave it at “Basic”
Minimum expire TTL - 4 hours. This controls how long should the browser cache a resource before having to download it again. Larger values are better for speed, but if you do any changes to the resources, visitors may not be able to see the changes until this time passes. 4 hours is the recommended setting by Cloudflare, so let’s leave it at that. Personally I’ve set it to 5 days, because I know that they change very rarely.
Auto Minify (Web optimization) - enable for JS, CSS and HTML. It minifies the source code, removing unnecessary symbols, whitespace, comments and other “crap” that your visitors will not see.
Rocket Loader™ (Web optimization) - test this out. In my experience it’s been hit or miss - it usually just reduced the performance. At the time of writing this feature is in beta, so things may have changed since. Simply try it out and see it for yourself - disabling the feature in case of problems is just a click away.
Pretty much all of the above things I mentioned above will work for any other website.
Level 2 - Full page caching (optional)
If you can enable full page caching - it gives an awesome boost (reducing the time it takes to download the initial HTML page from around a second to just 100 milliseconds (0.1 seconds). However, enabling it is tricky. The question is whether this exact method can be used on your website, since you will still want to leave certain pages dynamic. For instance, the admin panel should not be cached, contact pages and
wp-cron.php(more aboutwp-cron.phpin a bit). If you’re using Wordpress comments that may be a problem as well. Please note, that I have not tested whether Wordpress comments work when Cloudflare full page cache is enabled, but I have a good reason to believe that they would not work properly (question is whether HTTP POST will get through at all, and then the cached page on Cloudflare’s network would have to be purged somehow). New comments wouldn’t appear quickly for other visitors and may even not work at all. However, if you use external services for comments (e.g. Disqus or Facebook comments), you should be fine.Regarding
wp-cron.phpand cron jobs on Wordpress in general: I would discourage the use of default wordpress cron jobs. They happen during page load time, slowing page load down, which may result in a timeout. Use a “real” cron job instead (and runwp-cron.php). We’ll bypass Cloudflare cache forwp-cron.phpwith “Page Rules” in a bit, but I still wouldn’t recommend usingwgetfor running a cron job. It is a wrong tool for the job and is still prone to timeouts. Usephporphp5executable instead to avoid limitations.To enable full page caching, we’ll use Page Rules, so open that. It should be reachable from your dashboard.
We’ll create 2 rules:
- to disable caching of pages of login, admin panel, registration and etc. - all pages that need to stay dynamic. Add a new rule, use rule pattern “*mydomain.com/wp-*” without the quotes (e.g. I would use “*tautvidas.com/wp-*” if I was using Wordpress), set Custom Caching to Bypass Cache and leave other settings default, simply click Add rule
- to enable full page caching of all other pages. Add a new rule with rule pattern “*mydomain.com/*” without the quotes (e.g. “*tautvidas.com/*”), set Custom Caching to Cache Everything and leave other settings default, just click Add rule.
In order for this to work properly, make sure that “*mydomain.com/wp-*” rule is above “*mydomain.com/*” rule.
If you’re doing this for a website that doesn’t use Wordpress, this is where things will be different. You will have to look at your URL structure and act accordingly.
Level 3 - “Scotty, we need more power!”
This level is not achievable with a free acount, you will need at least a Pro account (it’s only 20$ per month and well worth the price).
Let’s get back into Cloudflare Settings page.
Settings Overview tab
SPDY - enable it. It is an experimental networking protocol, made primarily by Google. It is used only when available and usually provides up to 10% improvement in speed over regular HTTP.
Performance Overview tab
Website preloader - enable it. It automatically preloads static resources for quicker browsing experience.
Polish: image optimization - set to Basic. Once enabled, Cloudflare will automatically compress images and remove any unnecessary metadata without degrading image quality. If you can allow for the image quality to be degraded, choose Basic + JPEG for further improvement, which will compress images lossy, degrading image quality, but improving the speed.
Mirage 2 - decide for yourself if it works. It depends on the type of content your website provides. If the main focus is text and images are secondary, you may get away with enabling this. But if images are your primary content - enabling this feature may damage browsing experience. What it does is serve resized images for devices with smaller screens and “lazy load” images only when needed (non visible images will not be loaded).
Last thoughts
So far using Cloudflare has been a great experience. It is easy to setup, even easier to control, provides a large performance boost and can be free. One thing that would be nice is more flexible pattern matching for “Page Rules”, as you can do only so much with wildcards.
Check out Cloudflare at https://www.cloudflare.com/index.html or sign up at https://www.cloudflare.com/sign-up. Their slogan is “Give us five minutes and we’ll supercharge your website.” and I think they live up to it. It is a cheap way to speed up your website, considering prices of IT workers’ services.
I want to note that I do not work at Cloudflare, nor am I affiliated with them.
If you need help with getting Cloudflare to work for you, have any questions or comments or you’re simply interested in improving performance of websites - shoot me an email at
tautvidas (at) tautvidas.comor leave a comment below, I’d love to talk. -
Automated code deployment with Fabric
Gone are the days of source editing on a live server, uploading files to the server manually via FTP and doing post-install stuff by hand. Or at least that should be the case. For single server projects that may still be manageable (yet unbearably annoying), but if a project requires more than one server it is a real pain.
That is one of the reasons I recently have been trying to automate deployment of my projects. The deployment process can be run with one command and will happen mostly without human intervention (YMMV depending on project). If any problems occur on the live version, a patched version can be deployed much quicker than a human could - reducing deployment time from 30+ minutes down to just a few minutes.
Such tools are definitely important for System Administrators, however I would recommend Software Developers to look into it as well, as that may be beneficial for your projects as well.
Today we’ll be looking into Fabric, but there are larger packages with a slightly different purpose (e.g. Puppet or Chef are intended for server management) and they can still be used for this purpose.
Setting up
I will assume that you have your project hosted in a version control system, such as Git (Github) or Mercurial (BitBucket), that can be accessed by your target server. If you don’t use version control - you really really should (Why should I use version control?). If you don’t want to use version control, you still can use Fabric, you’ll just have to do more tailoring of deployment scripts for your situation.
We’ll be using git, but any other version control system would work just as well, just please set up deployment keys for your remote server so that it really can access the repo: For BitBucket, For Github.
Fabric is available through PIP. Run this to install Fabric:
pip install fabricOnce that’s done, run
fabto verify that fabric was successfuly installed. Output should be similar to:Fatal error: Couldn't find any fabfiles! Remember that -f can be used to specify fabfile path, and use -h for help. Aborting.Then go to your project folder and create
fabfile.pywhich will hold deployment code for our project.Our first fabfile
Before we do that, there are few things we’ll need to know.
fab task1 task2 ... tasknwill look for afabfile.pynearby and will try to execute functions with namestask1,task2, …,tasknwithin the fabfile. For more extensive list of usage look intofab -h.Fabric uses SSH as transport to run commands on remote machines (which usually are UNIX commands). Think of it as automated version of yourself running commands via terminal.
Useful list of commands:
fabric.context_managers.cd(path)- change directory, UNIX, remotefabric.context_managers.lcd(path)-cdanalog, localfabric.operations.local(command, capture=False, shell=None)- executecommandon local machinefabric.operations.run(command, shell=True, ...skipped...)- executecommandon remote machinefabric.operations.get(remote_path, local_path=None)- download files from remote machinefabric.operations.pu(local_path, remote_path=None, use_sudo=False, ...skipped...)- upload files to remote machine
That should be enough to get started. For more extensive documentation visit HERE.
And here’s our first fabfile:
from __future__ import with_statement
from fabric.api import *
from fabric.contrib import files
from fabric.contrib.console import confirm

env.hosts = ['web1']
DBUSER = 'root'
DBNAME = 'prod'

def production(version=None):
    with cd('<project path>'):
        run('git pull')
        if not version:
            run('git checkout origin master')
        else:
            run('git checkout live-%s' % version) # use specific tag
        if files.exists('sql/latest') and confirm('Run latest SQL upgrade?'):
            with cd(path):
                run('mysql -u %s -p %s < install.sql' % (DBUSER, DBNAME))
        else:
            print('Skipping SQL upgrade.')
The fabfile is rather simple and its goal is to pull the latest (or a specific) version from git and if needed run SQL upgrade scripts.
env.hostsholds address of the target server.withis a python context manager,cdhelps to simplify paths.Fabric will pull requested version from git and check if there are any SQL upgrade files. If there are - it will ask you if you want to run them and do so. Even with commands we’ve covered the script can be easily extended to do more complex things - build from source, sync static resources to backup servers.
This is script is pretty much what I use for my own projects, just slightly modified (e.g. I pull the version from source code, do automatic minification), but so far it is sufficiently convenient.
Last thoughts
I’ve only started using Fabric recently and wouldn’t call myself an experienced user, but so far it’s been a great experience. I like the level of automation that can achieved with it.
One problem I’ve experienced and haven’t been able to find a solution is with SSH key management. For some reason it will use a wrong key (ignoring SSH config) and won’t change to a different one. If you know a solution for this - I would love to hear it.
For official documentation go to Fabric homepage. They have a good tutorial, which you may find more understandable compared to my quick overview of my usage.
For my next adventure I will probably look into Puppet. Justin Weissig on Sysadmincasts.org did an episode on Learning Puppet with Vagrant - it’s very interesting.
If you have any questions or remarks about the post - please let me know either by email or in the comments below. I would love to hear from you.