-
Break Helper 1.6 update
Several years ago I made a simple extension for Google Chrome called Break Helper with the intent of having a tool that constantly reminds me to take a break. However, for the past year BH has been slightly broken due to changes in Chrome notifications mechanism. Previously raw HTML notifications were allowed, but that API has been long deprecated in favor of Rich Notifications, which are a bit more rigid and less powerful - you couldn’t have any buttons, JS code running in the notification, and only raw text was allowed. I recently noticed that support for notification buttons has been added, as well as a mechanism to update existing notifications, that allowed for some much needed changes to BH.
If you’re interested in trying it out, you can find it for free here: Download Break Helper from Chrome Web Store
Confirmations for notifications
In simplified version there were no confirmations. When it was time for a break, Break Helper would simply display a notification “Hey, time’s up. Time for a break!” and would automatically go into a break mode without any user interaction. After break was over, it automatically went back into work mode. The problem with this approach was that it was too easy to ignore. I found myself completely ignoring it for days, and I skipped a lot of breaks, which is not good for my health.
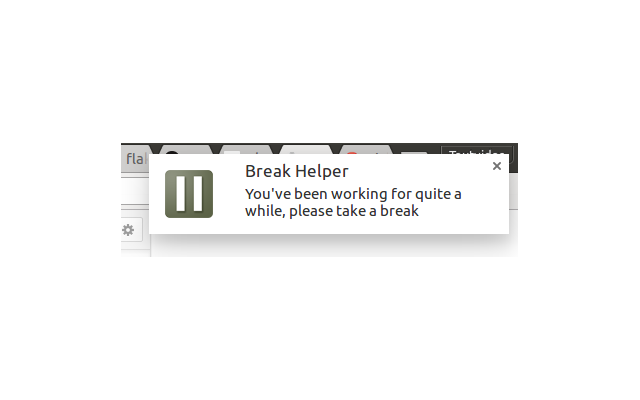
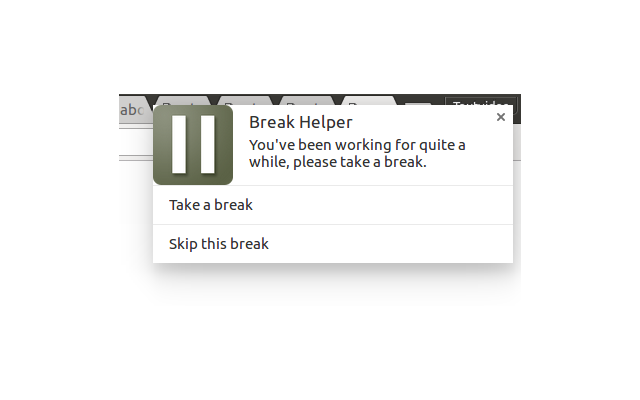
Instead, with the addition of button support to the Rich Notifications mechanism, I was able to add back confirmation buttons. That way if you’re still working, the notification won’t go away and will require user interaction. It’s easy enough to dismiss it by closing it or clicking “Skip this break”, but much harder to ignore it as it will stay in the corner of your screen. And, if you’re working on something important - it gives you a chance to finish your work.
Break time notification
Once the break starts, it simply used to state “You’re on a break” without a clear indication of how much time you have left.
But with improved Rich Notifications I was able to add a progress bar and a countdown timer clearly displaying the time left

Sound notification
Sound notifications were broken for a while, and they’re fixed again in 1.6 release. Also, I found the old notification sound too jarring. Previously BH used a sound clip of a ringing old school mobile phone, so this time I switched it to a less jarring “Solemn” chime I found on notificationsounds.com.
Thoughts for future improvements
- Requiring a user interaction for when the break ends. Sometimes one may not notice when it’s time to get back to work, and once you get back from your break - 5 minutes of work time have already passed. It may be a bit too annoying for frequent breaks, but perhaps it would be worth asking for user confirmation to get back into work mode.
- Code. You can find Break Helper’s code on GitHub (flakas/Break-Helper), and it’s not pretty. It’s quite error prone and difficult to maintain. It needs some dev love to refactor the code and clean up old obsolete pieces.
- Graphics and sales copy on Chrome Web Store. It’s fairly outdated, not very clearly pertaining the purpose of this extension.
So there’s still some work to do even on this very simple extension, but that’s a worry for 2017. However, I’m very happy to see that over 1000 users still actively use it (or ignore it).
And if you’re interested in checking out Break Helper, you can find it here: Download Break Helper from Chrome Web Store. It’s Free!
-
The Clean Coder: A Code of Conduct for Professional Programmers
“The Clean Coder” by Robert “Uncle Bob” C. Martin is related to his previous book “Clean Code”, except this time the focus is put on how a professional programmer should work, organize work or behave.
The book covers a broad range of topics, starting from how to behave as a professional and work with a team or with your clients, how to grow yourself as a professional, all the way to various software construction practices, like testing, QA, estimation, tools. At 200 pages it is a fairly short book, but it brings up interesting ideas and has good recommendations. I’m going to share several take-aways I got from this book, but of course there’s much more in it.
Working under pressure. There are times when you have a hard deadline, something critical needs to be done quickly, or perhaps you have a deadline approaching you’re not sure you can meet. At times like these you may start looking at how to cut corners, and disciplines are often suggested to be sacrificed. “Perhaps we don’t need to write tests right now” or “let’s skip the design phase, we can do it on the spot”. This leads into messes, which slow you down now or at some point in the future. E.g. skipping tests “for now” with the intent of catching up later, requiring a significant amount of manual testing, and later you may find the code too difficult to test.
Uncle Bob suggests finding a discipline you will adhere to even in times of crisis, if you’re not confident with your current one. Because a discipline will guide you through times of high pressure - “trust your discipline!” Crisis is the time to pay special attention to your discipline.
As for how to handle it personally, he recommends to stop stressing - “fretting won’t help”. Instead slow down and think through the problem, communicate issues with the team, bosses and clients. it is much easier to deal with and plan for if you know that a piece of software will have to be delayed from January to July, than to learn the day before release about the pushback. Issues need to be actively handled, wishful thinking that “hopefully it will fix itself” does not help and can be dangerous.
Professionalism, practicing and mentoring. The author outlines several guidelines a professional follows, like taking responsibility for one’s actions. “Do no harm. […] A software developer can do harm to both the function and structure of the software.” We want our software to work, our customers want it to work even more so. Uncle Bob suggests that “in order to be professionals, we must not create bugs”. Make sure your software works, either by testing manually, or, preferrably, automatically testing it. Don’t hope that your software works, prove it! “QA should find nothing.”
A professional developer knows his or hers field. That means dedicating some time to learn about fundamentals, new developmends and advances. Uncle Bob advocates for continuous learning and deliberate practice. Just like musicians or sportspeople practice, so should professional programmers. Some companies dedicate some time each week for learning and fun projects, but that’s not the norm. We own our careers and not our employers, so it is our responsibility to enhance it and care for it. As a way of practising the author suggests doing code katas, or mentoring others.
There were some other interesting soft skill related topics touched upon, like saying yes or saying no, time estimation, expectation management and working with the team. It is an interesting book, providing food for thought about the way we work. I would certainly recommend this book mostly to newer programmers, although seasoned vets may find ideas on how to improve themselves too.
If you’re interested in the book, you can find it here on Amazon: The Clean Coder
-
Taking notes with Vim and Guake
It is very easy to forget all the specific details you deal with during your work day, especially if you need recall them in several weeks. I certainly tend to forget specifics or tasks I’m supposed to do. And when writing weekly status reports for work, I end up second guessing myself as to where my time was sunk into over the week.
Recently I wrote a small note taking script and ended up making an effort to take notes throughout the day about what I’m doing, what is being discussed with others. Here it is:
#!/bin/sh

if [ $# -eq 0 ]
then
  FILENAME=`date +%Y-%m-%d`
else
  FILENAME=$1
fi

FILE=~/notes/$FILENAME

vim $FILE
The file
notesis stored in/usr/binand is assigned an executable flag.Usage:
notesopens up notes file for the current day. Files are named usingYYYY-MM-DDformat. If a file already exists, it appends to it, if it doesn’t - it creates a new file.notes <filename>opens up a specific notes file in~/notes/<filename>.
The basic idea is simple. On each day running
notescommand will open up a new file innotes/folder for that day, e.g.~/notes/2016-08-28. Notes can be written in free form, though I usually end up using Markdown style lists. If you need to browse older notes files, a file system explorer suits well. For content search tools likegreporackwork fine. Sharing notes across multiple machines is easy with a tool like DropBox.Guake is just a top-down terminal application. It is useful, because with a single hotkey it opens up a terminal above all other apps. So you can do work in your normal terminal or browser, hit F12 to open up Guake terminal (with note file already opened up in vim), take notes, hit F12 to hide Guake and continue working.
It ended up working really well. Looking up details of a particular day or week is as simple as opening several files. Good integration with the environment I already use minimizes friction, and I’ve been using it for the past month almost every day. Certainly a positive change.
-
Easy Arduino Bluetooth Communication with JY-MCU Bluetooth module
Last time we looked at measuring temperature using a digital temperature sensor. So we have several modules generating data, would be great to be able to access that data remotely. Let’s take a look at communication via Bluetooth with Arduino, as it turns out this is very easy!
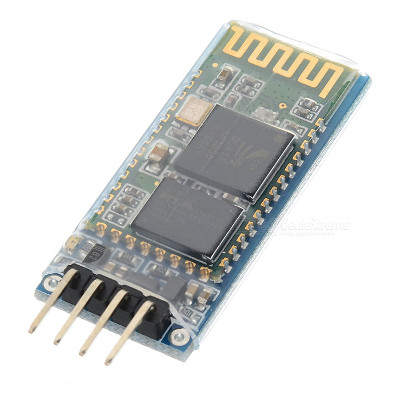
The Bluetooth module we’ll be using is called JY-MCU Bluetooth Board Module (4-pin). It’s pretty cheap, at this time costing only $5.97. Considering how ubiquitous Bluetooth is (most smartphones and laptops have it), it will turn out to be extremely useful in our future projects.
Here is the datasheet for the main module: HC-06 serial wireless module.
- The main module operates at 3.3V, but requires 3.6-6V to power the full package;
- Sleeping current is <1mA, working current is 40mA;
- Has a working range of about 10 meters
- Defaults:
- Baud rate: 9600
- Device name: linvor
- Passkey: 1234
It also provides some information on how to change the baud rate, device name and passkey, so make sure to check the data sheet.
Wiring
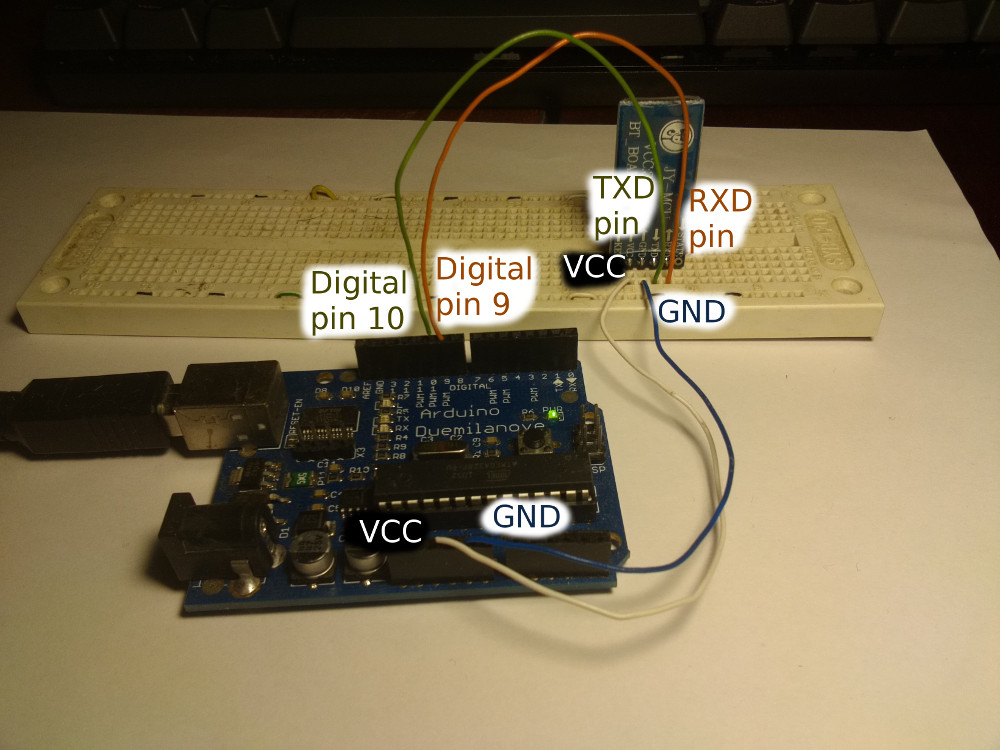
The wiring is really straightforward, no extra components are needed. Simply connect the 4 pins to your Arduino board.
Check the other side of the module, there you should find screenprinted markings of pins.
- Connect VCC pin of the module to Arduino’s 5V pin
- Connect GND pin of the module to Arduino’s Gnd pin
- Connect TXD pin of the module to Arduino’s digital pin 10
- Connect RXD pin of the module to Arduino’s digital pin 9
And that’s it. Let’s take a look at the code.
Code
Libraries
For transmitting information through the module we will use the default SoftwareSerial library. It is already bundled with Arduino, so no further downloads are necessary. Reading through the docs is, again, encouraged, as we will use very similar code to drive our JY-MCU module.
If you open up SoftwareSerial constructor docs, SoftwareSerial constructor is defined as such:
SoftwareSerial(rxPin, txPin, inverse_logic)Only two pins to drive the module, other than that the interface is exactly the same as serial communication to PC via USB. We don’t need to worry about
inverse_logicparameter.Program code
/**
 * JY-MCU Bluetooth module communication example for Arduino.
 *
 * Connect RX_PIN to TX pin of the module,
 * Connect TX_PIN to RX pin of the module.
 *
 * Based on SoftwareSerial example by Tom Igoe and Mikal Hart.
 * Adapted for JY-MCU module by Tautvidas Sipavicius.
 *
 * This example code is in the public domain.
 */

#include <SoftwareSerial.h>

const int RX_PIN = 10;
const int TX_PIN = 9;
const int BLUETOOTH_BAUD_RATE = 9600;

SoftwareSerial bluetooth(RX_PIN, TX_PIN);

void setup() {
   Serial.begin(9600);
   bluetooth.begin(BLUETOOTH_BAUD_RATE);
}

void loop() {
  if (bluetooth.available()) {
    Serial.write(bluetooth.read());
  }
  if (Serial.available()) {
    bluetooth.write(Serial.read());
  }
}
First we include the library and set our RX and TX pins. We’re setting communication pins to 10 and 9, but you can choose other ones if needed. Let’s leave the default baud rate of 9600 for this example.
Bluetooth Serial initialization works exactly the same way regular Serial communication works, we call
beginmethod with the baud rate.loop()logic is simple. If there is any data received by the bluetooth module, send it over the regular Serial connection to our PC. If PC sends information via Serial, then we send that information over via Bluetooth.Testing
Now that we have wired up the module and have the program loaded on our Arduino, we’d like to test it out.
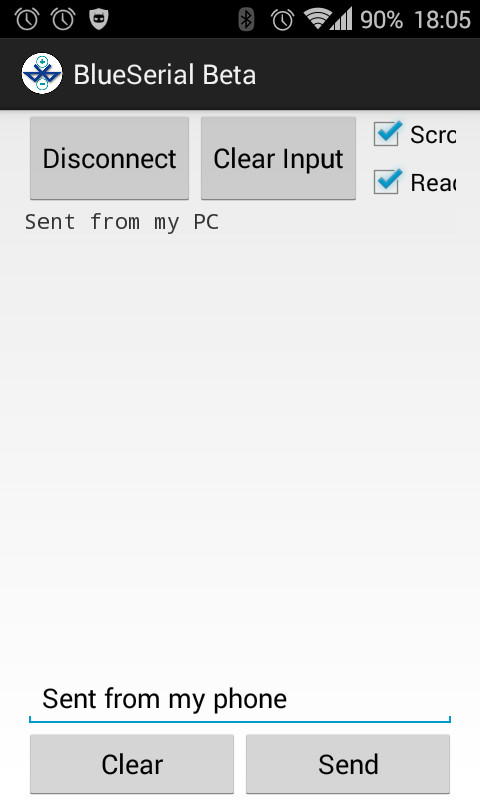
If you have an Android device, there is this Blue Serial app for testing serial communication over Bluetooth. For Apple devices there should be something similar on the App store as well.
Once we turn on Arduino, a red light on Bluetooth module should be flashing continuously. Once connection is established, that red light will stay on constantly.
If you open up your Bluetooth testing application of choice (I used “Blue Serial”) and search for devices, you should be able to find a device (by default) named “linvor”. Pair with it and use the (default) pairing key “1234”. Once paired with the device, click “Connect”.
If it connected properly, the red light on the Bluetooth module should stop flashing.
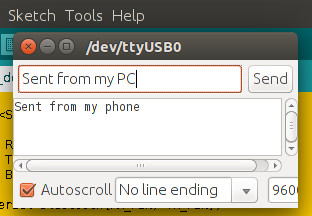
Now you can send information from the device over bluetooth to Arduino, and, if you used the example program above, Arduino will send it over to computer’s Serial window. Arduino Serial Monitor can be opened up on your Arduino IDE by clicking “Tools > Serial Monitor (Ctrl + Shift + M)”
Here I sent some information from my PC to the phone and vice versa:
Further reading
If you’re interested to learn more about this, here are some extra resources:
And if you want to buy the JY-MCU bluetooth module, here’s the link: Buy JY-MCU Bluetooth module
-
Measuring temperature with DS18B20 temperature sensor
Last time we looked at measuring distance using an ultrasonic sensor. This time we continue looking at using different sensors with Arduino. This time let’s take a look at measuring temperature.
I’ve purchased the Keyes DS18B20 digital temperature sensor module for $2.74. Pretty cheap, considering we can use it as a plug and play module, without the need for extra components. Of course, we could buy the sensor, a 4.7 kOhm resistor and connect it all ourselves.
If you take a look at DS18B20 datasheet, you’ll find it’s a pretty interesting and complex device.
- The sensor can be powered with a 3.0V-5.5V power supply, so a 5V rail from a standard Arduino board will work just fine for that.
- It can measure temperatures from -55C (-67F) to +125C (257F), which is perfect for general usage at home.
- +- 0.5C accuracy, temperatures can be measured in 0.5C, 0.25C, 0.125C or 0.0625C increments.
- Multiple such sensors can be connected do a single (!) data line, meaning we could control more than one sensor with just a single wire.
- Supports upper and lower temperature alerts
I suggest to browse through the data sheet for more details. It’s very detailed and it’s impressive how much is crammed into that small package.
Wiring
The wiring is really straightforward. Since we are using the module, it already has a pull-up resistor on the board, thus we do not need any additional parts.
The DS18B20 temperature sensor supports receiving power via the data pin (search for “parasite power” in the data sheet if you want to learn more), but we’re going to power the sensor with Arduino’s 5V rail, as it’s simpler that way.
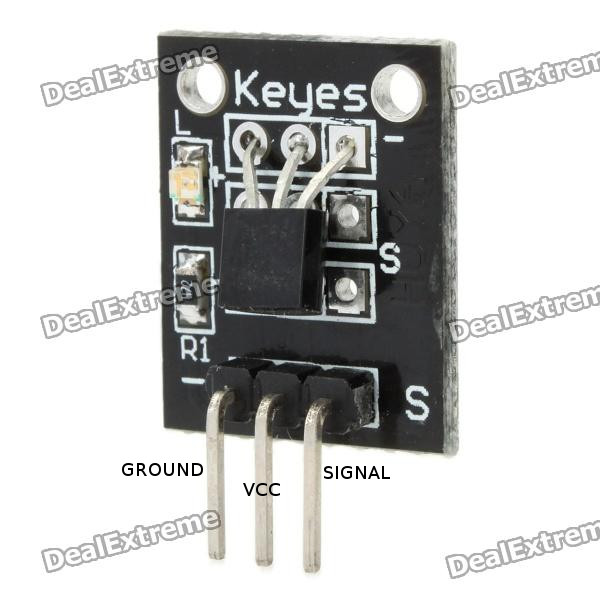
The module I’ve received has been labeled differently compared to the one in the first picture (
G R Yinstead of- s), but pins are exactly the same no matter the printed labels:- Left pin is GROUND pin
- Middle pin is VCC pin
- Right pin is SIGNAL pin
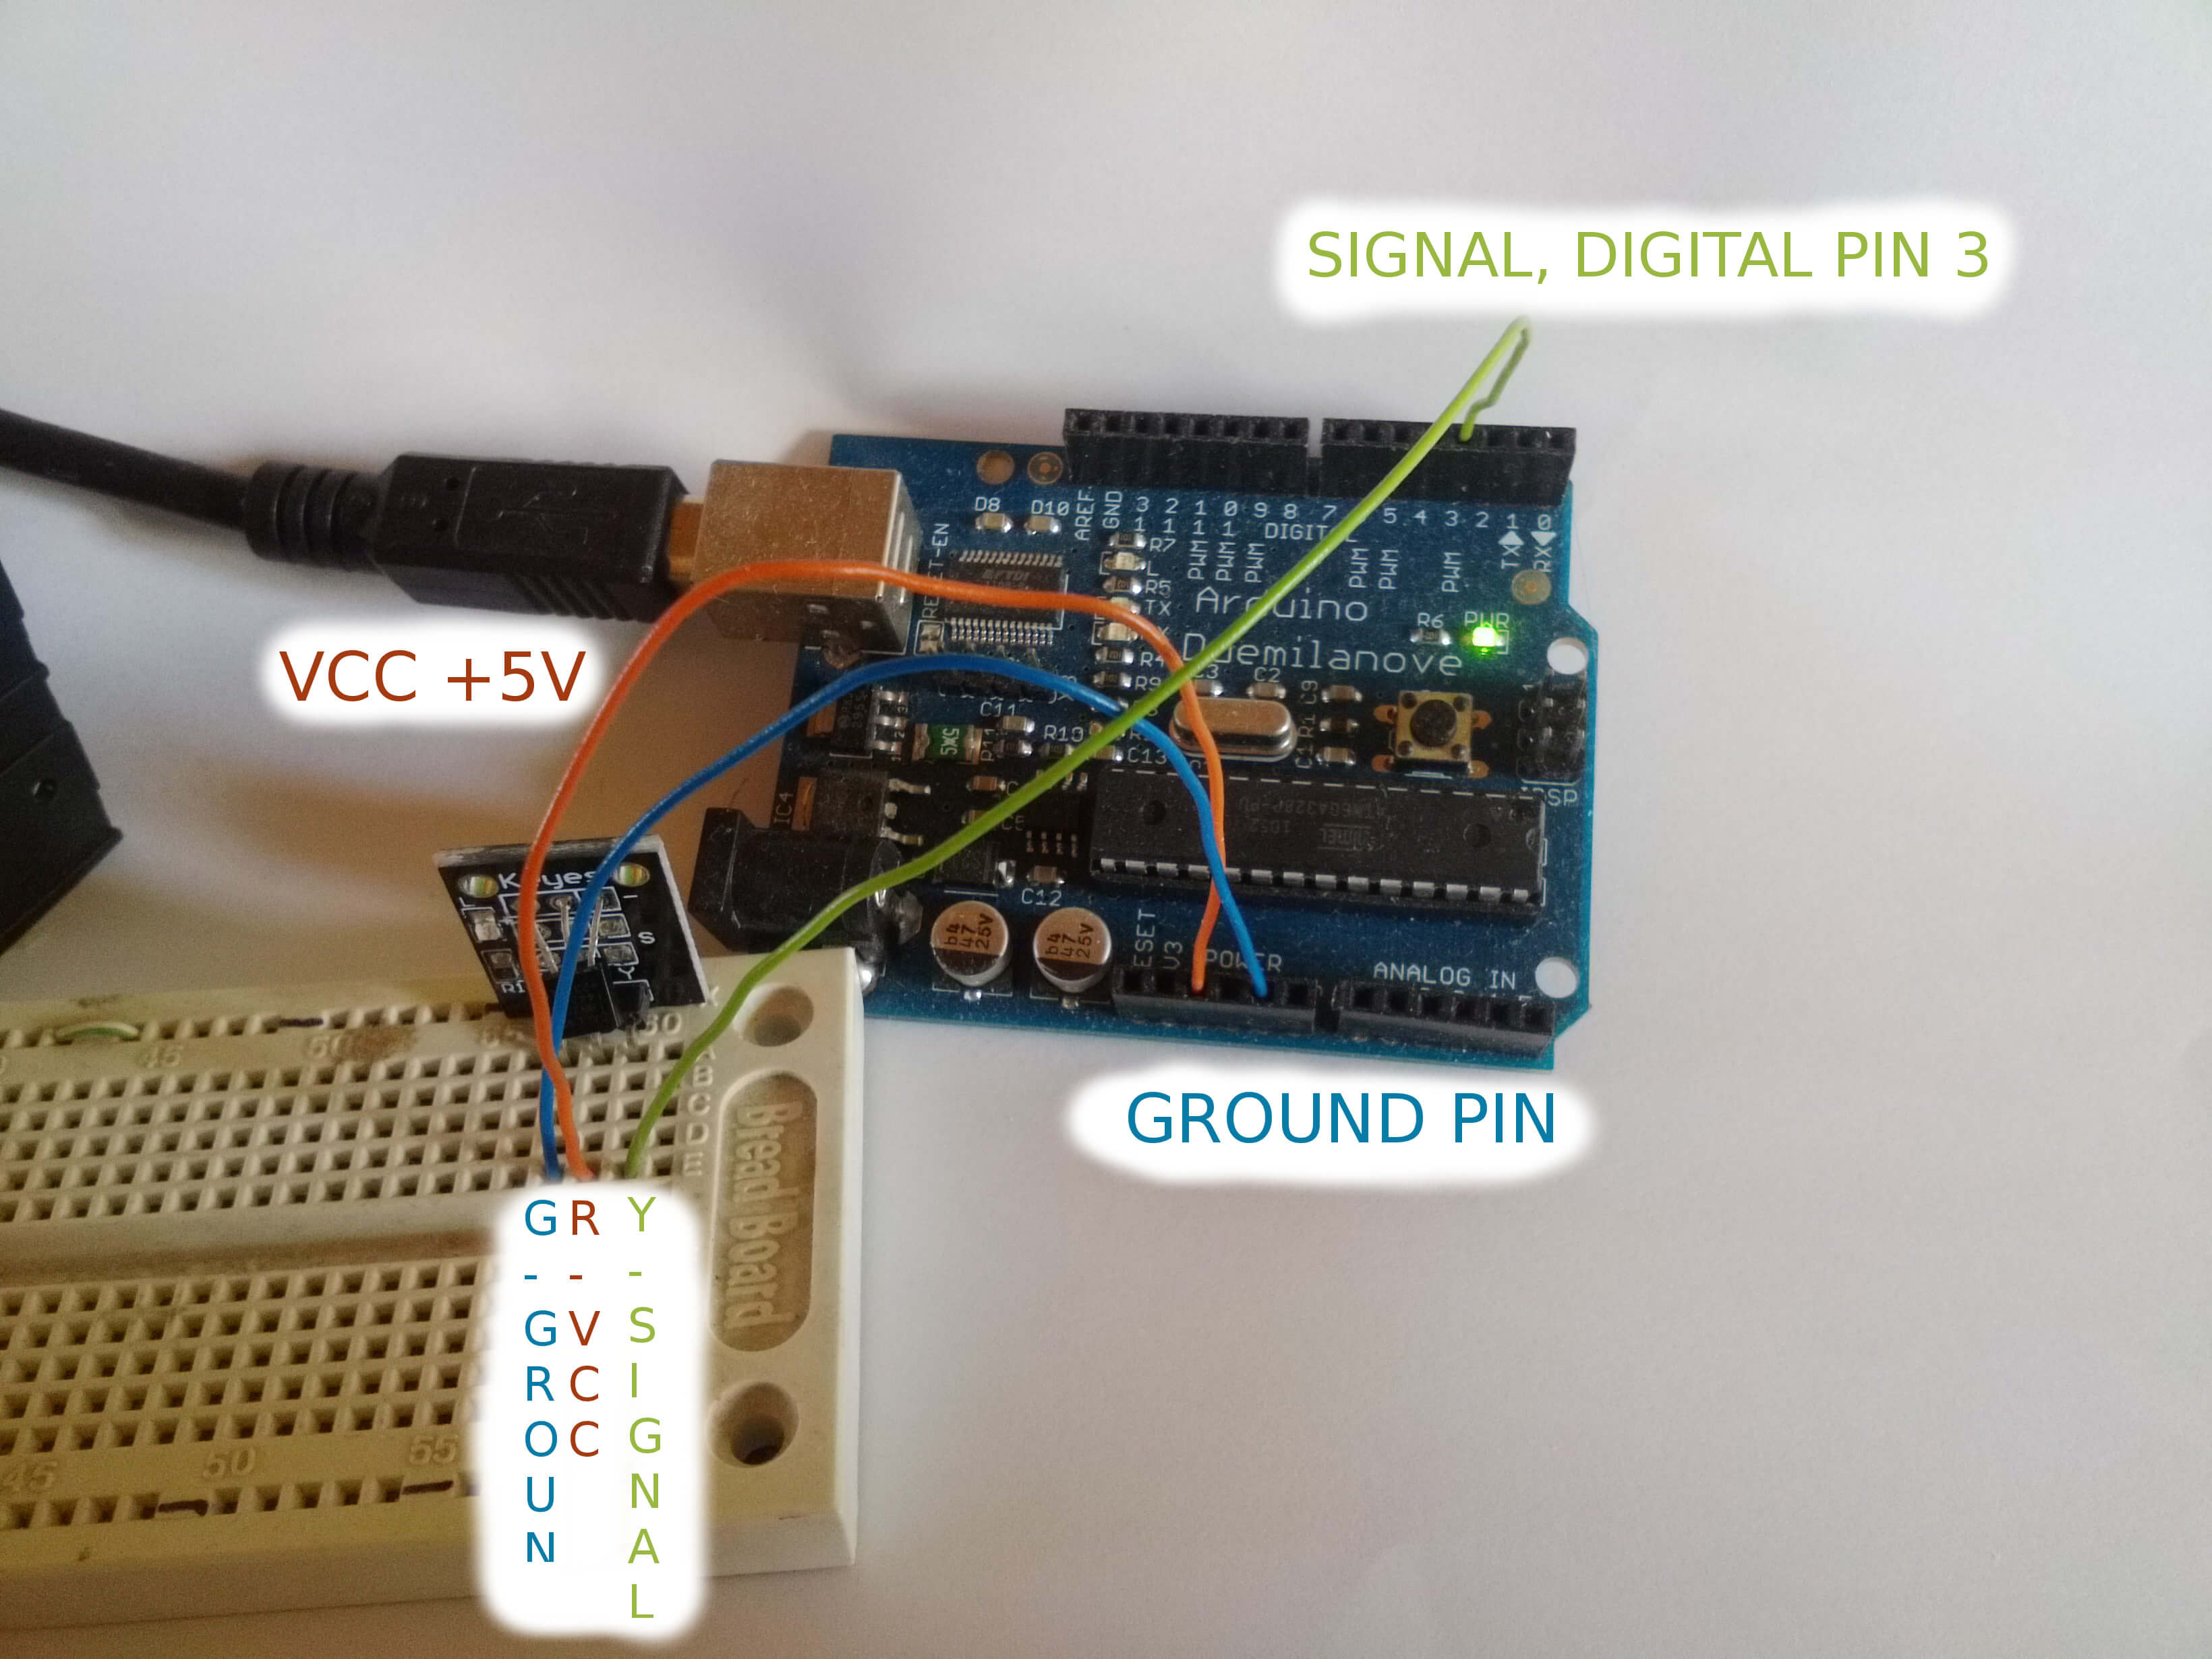
And so we connect pins accordingly:
- Left pin (GROUND) -> GND pin on Arduino board
- Middle pin (VCC) -> 5V pin on Arduino board
- Right pin (SIGNAL) -> Digital pin 3 on Arduino board (could be any other digital pin).
Note that we’re using a digital pin for input, that’s because the sensor returns digital values.
Code
If you’ve read the datasheet, you’ll quickly learn that using the sensor is not as simple as writing a few lines of code. But we’re in luck, because there are two libraries that are going to help us and make it easier.
Libraries
The first library is called OneWire (download directly from author or from Github). What it does is allows us to communicate with 1-wire devices, such as the DS18B20 temperature sensor we’re using.
The second library we’ll use is called “Dallas Temperature Control Library” (download directly from author or from Github). It provides convenient calls to control the sensor and is intended to use with the exact DS18B20 sensor.
Download both libraries and extract them into your
sketchbook/librariesfolder. That will allow us to directly include them in our Arduino program.Program code
Our goal with this program is to simply measure the temperature synchronously using one temperature sensor (though the library provides tools for asynchronous measurements as well as measurements using multiple sensors, should you be interested in that).
Here’s the complete program code, let’s take a look at it piece by piece.
#include <OneWire.h>
#include <DallasTemperature.h>

// Sensor input pin
#define DATA_PIN 3
// How many bits to use for temperature values: 9, 10, 11 or 12
#define SENSOR_RESOLUTION 9
// Index of sensors connected to data pin, default: 0
#define SENSOR_INDEX 0

OneWire oneWire(DATA_PIN);
DallasTemperature sensors(&oneWire);
DeviceAddress sensorDeviceAddress;

void setup() {
  Serial.begin(9600);

  sensors.begin();
  sensors.getAddress(sensorDeviceAddress, 0);
  sensors.setResolution(sensorDeviceAddress, SENSOR_RESOLUTION);
}


void loop() {
  sensors.requestTemperatures();
  // Measurement may take up to 750ms

  float temperatureInCelsius = sensors.getTempCByIndex(SENSOR_INDEX);
  float temperatureInFahrenheit = sensors.getTempFByIndex(SENSOR_INDEX);

  Serial.print("Temperature: ");
  Serial.print(temperatureInCelsius, 4);
  Serial.print(" Celsius, ");
  Serial.print(temperatureInFahrenheit, 4);
  Serial.println(" Fahrenheit");
}
We begin by setting up
OneWireandDallasTemperature.DeviceAddresswill be needed to directly address a specific sensor in our sensor array. But we have only one sensor, so that won’t matter too much.Setup function is pretty simple as well.
sensors.begin()initializes the sensor. Withsensors.setResolution(address, resolution)we can change the resolution of a sensor. The sensor can output values in 9, 10, 11 or 12 bits. Lower resolution means faster measurements:- 9 bits: increments of 0.5C, 93.75ms to measure temperature;
- 10 bits: increments of 0.25C, 187.5ms to measure temperature;
- 11 bits: increments of 0.125C, 375ms to measure temperature;
- 12 bits: increments of 0.0625C, 750ms to measure temperature.
sensors.requestTemperatures()will request the sensor to start the measurement. The measurement does not happen instantly, it may take up to 750ms to get the result. Since we are doing synchronous measurements, the processor will simply wait for the result before continuing.sensors.getTempCByIndex(index)andsensors.getTempFByIndex(index)calculate temperatures in Celsius and Fahrenheit respectively. The sensor actually is calibrated to work in Celsius, so Fahrenheit values are coverted from Celsius by the library. Both returnfloatvalues, which may be readily used in other program logic. In this case we simply print them out in the Serial Monitor.Here’s the result in high resolution (
SENSOR_RESOLUTION = 12):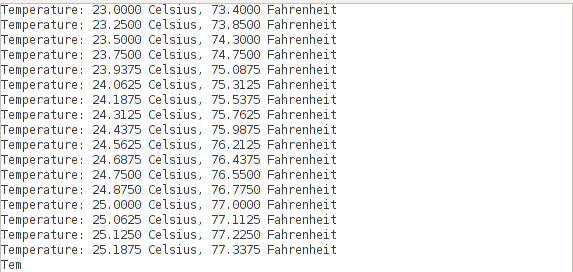
And here’s the result in lower resolution (
SENSOR_RESOLUTION = 9):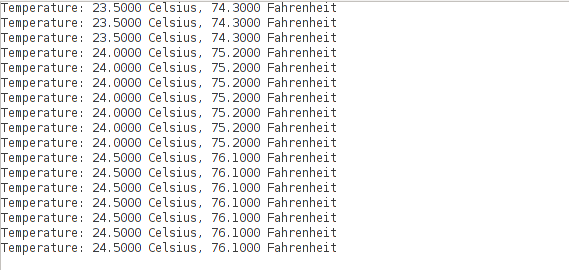
Further reading
If you’re interested to learn more about this, here are some extra resources:
- OneWire library
- Arduino Playground on OneWire library
- Miles Burton’s Dallas Temperature Control Library wiki
- DS18B20 datasheet
And if you want to buy the DS19B20, here’s the link: Buy DS18B20 temperature sensor module
