-
Tmux - a Terminal multiplexer
If you’ve been using Linux for some time, chances are that you’ve used (or are still using) a terminal multiplexer of some sorts. Usually it’s GNU Screen, which I’ve been using myself for quite some time. However I recently discovered Tmux, which I want to talk about.
Terminal multiplexer, what’s that?
Terminal multiplexers allow you to create, navigate through and use multiple virtual terminals in one window. You can navigate through panes and windows with keyboard shortcuts, which usually are faster to use than to spin up another terminal window.
Another great thing multiplexers like Tmux do is window tiling. Split your window into multiple panes for easier server monitoring and watch each tool as it’s being updated simultaneously, change to another virtual window and you’re back to coding or doing whatever you want. It speeds up your work and increases your productivity rate. Personally, I’ve started using GNU Screen just a few months ago and discovered Tmux only a week or so ago, but I’m much happier and more productive with them than ever before.
Why Tmux?
-
It is simple
-
It has great documentation
-
Supports horizontal and vertical splitting (panes) with automatic (or manual) height/width adjustment
-
You can easily customize it
-
Even out of the box it is nicely configured

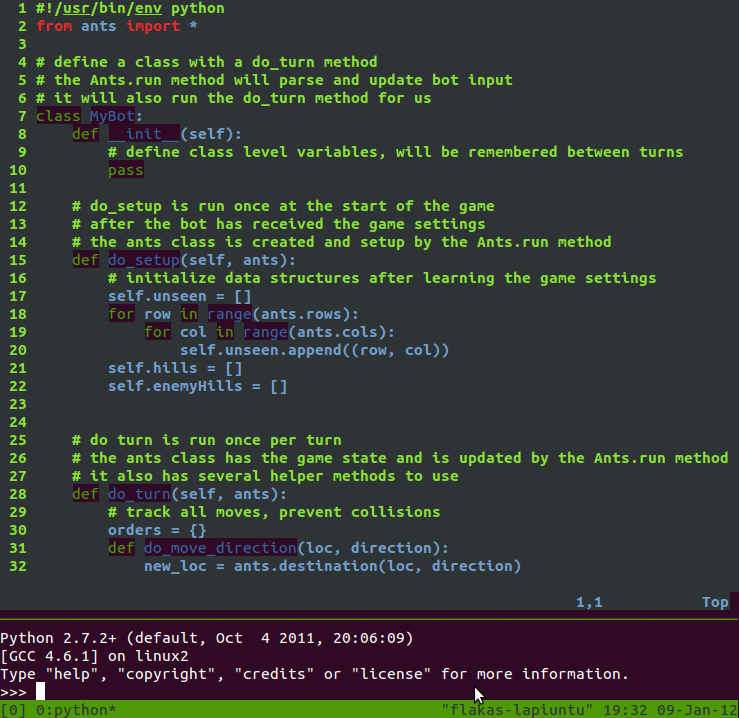
As you can see in the image I have opened up my code in one pane and python interpreter below it. It’s not as impressive as it could be. A step up would be running editor, documentation, tests and shell in 4 panes and it’s not even breaking a sweat.
Configuring Tmux
set -g prefix C-a
unbind %
bind \ split-window -h
bind - split-window -v
bind-key k select-pane -U
bind-key j select-pane -D
bind-key h select-pane -L
bind-key l select-pane -R

unbind C-b
bind C-a send-prefix
#force reload of a config file
unbind r
bind r source-file ~/.tmux.conf

#quick pane cycling
unbind ^A
bind ^A select-pane -t :.+
This is the configuration file ~/.tmux.conf that I currently use. Firstly it remaps prefix hotkey to C-a (Ctrl + a) and maps hotkeys for vim-like behavior navigating around panes.
So C-a j would move you one pane down, C-a l would move you one pane to the right and so on.
A few commands I found useful:
Ctrl-b : resize-pane -D 20 (Resizes the current pane down by 20 cells) Ctrl-b : resize-pane -U 20 (Resizes the current pane upward by 20 cells) Ctrl-b : resize-pane -L 20 (Resizes the current pane left by 20 cells) Ctrl-b : resize-pane -R 20 (Resizes the current pane right by 20 cells)
-
-
Combining multiple MySQL UPDATEs
Probably every programmer does this at least once in their lifetime. Suppose you need to write a script that counts how many times each product is shown on an e-commerce website. What do you do? Usually one may come up with such solution:
while(there_are_products) {
 show_product();
 update_product_display_count_in_the_database(); // UPDATE products SET displays = displays + 1 WHERE product_id = '5';
 }
It works, right? Where’s the problem?
The problem is that if you have 500 products displayed, you will have to update each entry individually, basically you’ll have to run 500 queries. That doesn’t seem that efficient to me.
Think for a minute how you could improve this.
Instead we could update everything in one batch. E.g.:
products_to_update = array()
 while(there_are_products) {
 show_product();
 products_to_update.add_to_array(product_id);
 }
 update_products_in_a_batch(products_to_update); // UPDATE products SET displays = displays + 1 WHERE product_id IN (5, 6, 99, 16, 35)
In other words, use a where clause like WHERE field IN (field_value1, field_value2, … , field_value_n). Basically in this case we would always be running just a single MySQL query. Success?
As an analogy you could take excavation. If you need to move a pile of dirt to another place 200 miles away, are you going to use a shovel and run back and forth each time or are you going to use a truck?
-
Free classes you might want to attend
If you at least occasionally read Hacker news, you might have stumbled upon a few free online courses Stanford university is offering. They are offering three classes: Introduction to Artificial Intelligence, Introduction to Databases and Machine Learning.
Introduction to Artificial Intelligence
The course will be taught by Sebastian Thrun and Peter Norvig, the classes will begin on October 10th and will continue for 10 weeks. Here’s the video about the course:
Over 60,000 have already signed up, what are you waiting for? Check it out at www.ai-class.com
Introduction to Databases
If you program, you need to interact with Databases in some way constantly. In this course you’re going to learn about SQL databases, relational databases, XPath, OLAP, NoSQL and a bit more (description is on their website). The instructor is Professor Jennifer Widom.
Check the course out at http://db-class.org/
Machine Learning
This is the course I’m looking forward to the most. Machine Learning can be used in A LOT of different places: from suggesting music and robots to search engines and data mining. The instructor is Professor Andrew Ng.
You can find this course at http://www.ml-class.org/
Oh, and did I mentioned that all three courses are by Stanford University professors and are absolutely free to everyone?
Personally I’ve signed up for all three. I don’t know if I will be able to attend all three, but I’ll do my best!
How about you? Did you register to any of these?
-
Test driving Django: installation and configuration
Django is a Python web framework. It is one of the most popular Python frameworks. You can find it HERE.
I wanted to take a look at Django for quite some time and today is the day!
To begin with Django you firstly need to download and install it. So…
How to download and install Django
Download it:
wget http://www.djangoproject.com/download/1.3/tarball/Extract it:
tar xzvf Django-1.3.tar.gzOpen the folder and install it:
cd Django-1.3/
python setup.py build
python setup.py install
Now you should have Django installed. Next step would be to create a Django project.
How to start a Django project
Open the directory you want to create the project in and execute this command:
django-admin.py startproject myprojectChange into myproject directory and you should find a few files:
-
init.py
-
manage.py
-
settings.py
-
urls.py
To verify that it is in fact working, you need to fire it up. Django includes a simple web server written in Python. It is important: do not use Django built-in web server for production, use it for development ONLY! After all it’s only a framework. To launch the application use this command:
python manage.py runserverNow if you open up http://127.0.0.1:8000/ in your browser, you should see a demo Django page. If you see it - congratulations, you’ve done everything right and you’re ready to go!
Configuring the app
Every single application (or next to every single one) needs some changes to the default configuration. Modify settings.py file to configure the application. Since I’m going to take a look at database usage and I only have MySQL installed, let’s try using it. Set the database engine to django.db.backends.mysql and enter login details. You might need to install python-mysqldb package (if you’re using Linux like me). You can do that by executing:
sudo apt-get install python-mysqldbAfter that run syncdb to add necessary tables:
python manage.py syncdbIf you don’t get any errors you’re all set to start coding!
-
-
Break helper 1.3 released
Download the latest Break helper 1.3
It has been over a month since the last Break helper version was released. In the newest 1.3 we have a bit more useful changes, some UX (User eXperience) improvements, hopefully that will make Break Helper a bit easier to use.
Some users requested a feature to reset the timer. It was a great idea, because sometimes you go away from your computer and the application is still going without noticing that the user is gone. Actually this might morph into another feature that checks the state of the user to detect when he is away and to pause the breaks.
Another feature the users requested and I’ve planned to add for a while is a timer, that displays how much time is left until the next break.
About a month ago one of the users complained, that there is no easy way to configure and navigate the extension without digging a bit deeper. That struck me - it was a major UX flaw. The way the popup was designed was not useful in any way, so I threw it away and into that popup I moved the “Time left until next break” timer and a simple navigation. Ah, that’s much better. Thank you Eddy!
One of the more important improvements is in readability. It is a no-brainer that it is hard to read small fonts, but it took me a while and an article to understand how bad it is. Increased font size is just a small step, but it should help. Probably the next step would be to pick text and background colors to get a contrast.
That is pretty much it aside from a few minor bug fixes. If you have any suggestions or complaints - please don’t hesitate to let me know in comments below or in extension’s reviews. I greatly appreciate any user feedback.
You can download Break helper for Google chrome at Chrome web store